Directions to Make a Labyrinth
Few things are more rewarding than to create a labyrinth and walk it afterwards. The love and care that go into the building - and in the walking - add to the transformative benefits of the labyrinth.
This part of the website will teach you how to make your own labyrinth. Currently, we have just directions for the Masking Tape Chartres Labyrinth. In the future, we will be adding Baltic, Classical, and Concentric labyrinth directions as well as tips for use of materials and other information to help you in your labyrinth-building efforts.
12 What about the Pillars?
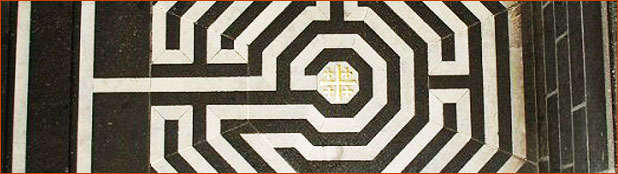
The beauty of using masking tape is that the labyrinth can be altered to go around  obstructions, such as pillars. If there are pillars in the space where you are installing the labyrinth, you can do several things. One is to put a pillar in the center of the labyrinth and size your labyrinth to fit within the next row of pillars. A second possibility is to incorporate the pillars within the labyrinth.
If there is a pillar in the center, there will be no place to attach the measuring guide. Here's a solution. Measure the dimensions of the pillar and draw them on a piece of posterboard. Then use a compass to draw a circle that goes around the shape of the pillar, just touching the corners. Cut out the segments bordered by the circle and the pillar (shaded area in illustration to the right) and tape them on the floor next to the pillar, forming a circle. Proceed as before, this time having someone hold the guide to the edge of the circle, moving it slightly each time you reposition the rope (rather than having a center post). The person at the other end of the measuring rope can place the rope so it lines up with the center of the pillar. This will be accurate enough to get a usable result.
For pillars towards the outer edge of the labyrinth, just route the circuits around them as necessary. With tape, anything is possible.

Finally, if there is time left, you might want to trim some of the turns. I tape a razor knife to the end of a yardstick and swing it in a circle like a big compass. The end result gives a very finished appearance to what otherwise may be a rather rustic labyrinth. Likewise, if you have so many volunteers that you don't know what to do with them, you could make all of the lunations circular rather than rays. (I'm crazy about labyrinths, but I've never been THAT crazy.)
Voila, you now have a Chartres-pattern masking tape labyrinth. Or, you could do this.jpg) out doors with rocks. The technique is the same, putting rocks around in circles and then filling in between them later.
out doors with rocks. The technique is the same, putting rocks around in circles and then filling in between them later.
We would like to thank Robert Ferré for allowing us to use these pages on the Chartres type labyrinth. They come from his excellent website Labyrinth Enterprises.